Connecting the channels
A channel is a door a customer writes to you through. Until one is connected there are no conversations to handle, and that is why it weighs the most in the configuration progress: without connected channels the agent has no conversations to handle.
It all happens under Settings → Channels. There are ten cards, and they are not all the same thing: some connect an account that already exists on another platform, others create something new that you put on your own site.
| Channel | What it is |
|---|---|
| The main channel. Connects a line to the WhatsApp Business API. | |
| Instagram and Facebook Messenger | Direct messages from your social accounts. |
| TikTok | TikTok direct messages. |
| Web chat | A chat of your own, embedded in your site. |
| Biky Widget | A floating button with the agent's avatar leading to WhatsApp, a template or a website. |
| Web form | A form that turns visits into contacts. |
| Code builder | Bundles several widgets into a single script for the site. |
| Meta forms | Leads from Facebook and Instagram ad forms. |
| Call lines | Telephony, to talk by voice rather than text. |
Meta's windows are Meta's
WhatsApp, Instagram and Facebook Messenger are connected through Meta's own wizard, which opens in a popup. That part is not Biky's: Meta defines the wording and the order of the steps, and changes them now and then. What does stay the same is what you need ready before starting, which is where nearly everyone gets stuck.
WhatsApp
The main channel, and the most demanding to connect: behind it there is a WhatsApp Business API account that Meta has to approve.
Before you start
| You need | Why |
|---|---|
| A free phone number | It cannot be registered in the WhatsApp app (neither the regular one nor WhatsApp Business). If it is, that account has to be deleted from the app first; otherwise verification fails at the end of the process, once you have filled everything in. |
| A number that can receive an SMS or a call | That is how Meta verifies the number is yours. |
| Administrator access to the company's Meta Business | The wizard asks you to pick a business portfolio and approve permissions; without that role none show up. |
| A company website | Meta asks for it and reviews it. It has to be the brand's site, not a social profile. |
The number stops working in the app
Once a number moves to the WhatsApp Business API, it can no longer be used from the WhatsApp app on a phone. All the conversation moves to Smart Chat. Do not use anyone's personal number, or the one people already use to reply by hand, without telling the team first.
Connecting the line
- Under Channels → WhatsApp, click Add channel. Meta's window opens.
- Sign in with the Facebook account that manages the business.
- Pick the business portfolio (the company's Meta Business account).
- Fill in the company details: name, website and country.
- Create or pick the WhatsApp Business account and its profile: an internal name, only visible in Meta, and the display name, the one your customers will see in the chat.
- Add the number: country code and phone, and choose whether to get the code by SMS or by call.
- Type the verification code you receive.
- When it finishes, the window closes and the line shows up in the list.
The display name is hard to change
The display name is the one that appears in every customer's chat, and Meta reviews it. Changing it later means another review, so get it right the first time: the brand's name, not "Testing" or "Sales 2".
The list of lines
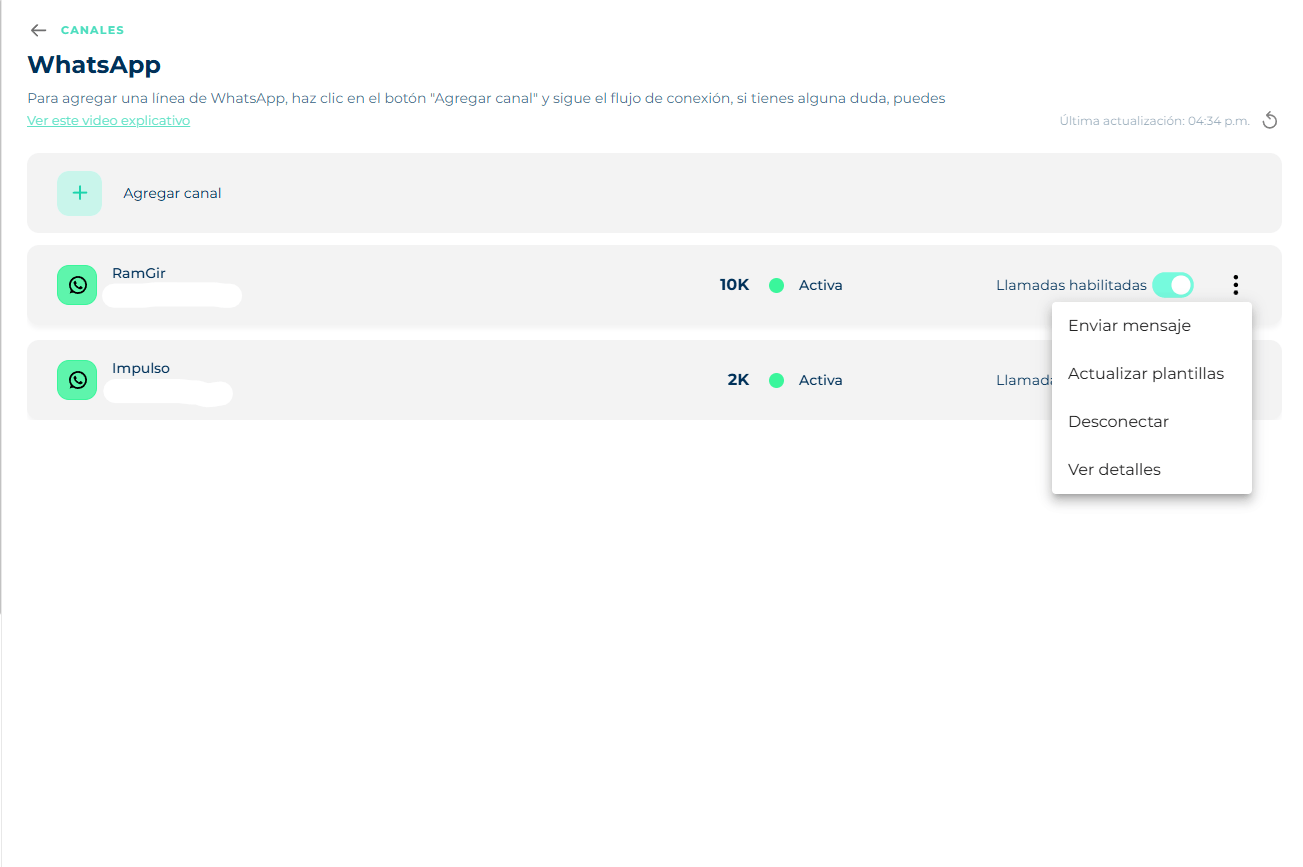
Each row is a line, and shows four things: the name and number, the message limit, the status, and the calls switch. Top right, the last updated time with a refresh button — the data comes from Meta and does not refresh on its own.
The limit: what that 10K means
It is the number of distinct customers you can write to first every 24 hours. It does not limit replies: if the customer wrote to you, you can always answer. What counts are the conversations you start — an Outbound campaign, a template sent from Smart Chat.
Meta assigns that tier — 250, 1K, 2K, 10K, 100K, unlimited — and raises it on its own as you use the line without people blocking or reporting you. It cannot be bought or requested.
The limit is shared between the lines of the same business
If you have two lines under the same Meta account, the quota is one for both. Sending a large campaign through one leaves the other with no room that day. That is the classic mistake: splitting sends across lines believing it doubles the reach.
That number is, in practice, the ceiling of your next campaign. If your segment has 15,000 contacts and the line is at 10K, 5,000 of them get nothing that day.
The status
Active is the normal one: the line sends and receives. Anything else means Meta has limited or suspended the line, and it will not deliver until that is sorted out on Meta's side.
Calls enabled
The switch turns on WhatsApp voice calls for that line: your team can call a customer from the chat, with no telephony and no minutes.
Off, the call button on the contact card is disabled for every chat on that line, with a notice saying the line has not enabled calls. Turning it on is not enough to call: the customer also has to authorize it. The whole path is in WhatsApp calls.
Each line's ⋮ menu
| Option | What it does |
|---|---|
| Send message | Opens sending a WhatsApp message from that line, without going through Smart Chat. Useful to check the line came out connected properly: you write to your own number with a template and see whether it arrives. |
| Refresh templates | Pulls your templates and their approval status from Meta again. The platform keeps a copy, so a just-approved template can take a while to show in the selector. If approval just came through and you do not see it when creating a campaign, this is what to use. |
| See details | Opens the line's profile. See below. |
| Disconnect | Unlinks the line from your Biky account: messages stop coming in and going out through it. It does not delete the chat history, which stays in Smart Chat, nor the WhatsApp Business account in Meta — the number is still yours and can be connected again. |
Disconnecting leaves the team without that channel
Open chats on that line can no longer be answered. If it is the only line, the account has no WhatsApp until it is connected again.
See details: the line's profile
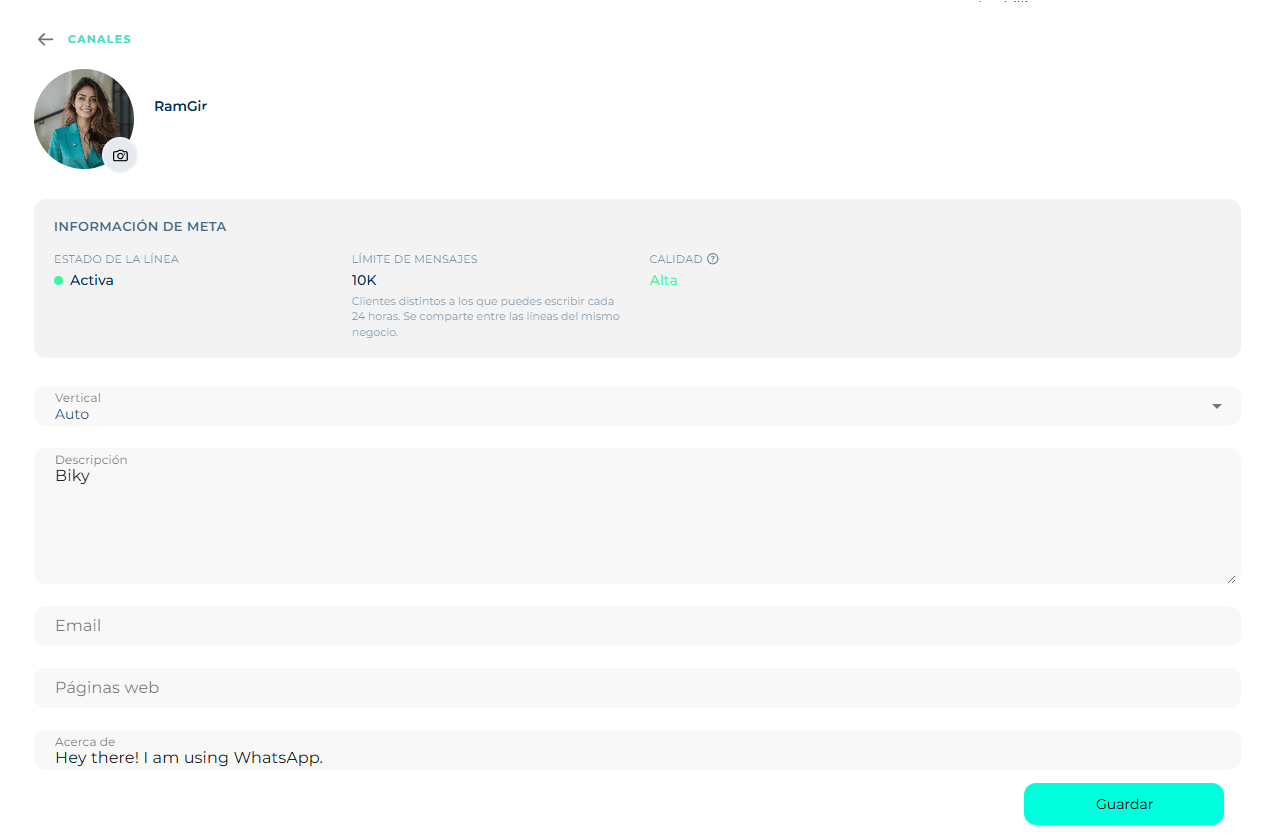
This is the business card your customers see when they open your contact in WhatsApp, plus the data Meta reports about the line.
Meta information (read only, comes from Meta):
- Line status.
- Message limit, with its explanation.
- Quality: High, Medium or Low. Meta rates it by how people react to your messages — blocks, reports, mutes. It is the early signal that matters: quality drops before Meta drops your limit. If you see it at Medium after a campaign, review who you are writing to before sending the next one.
What is editable, which is what shows in WhatsApp:
- The profile picture and the name.
- Vertical: the business sector (Auto, Health, Retail…).
- Description, Email and Websites.
- About: the short line under the name. It comes with the default "Hey there! I am using WhatsApp"; changing it is one of the cheapest things you can do to not look like an improvised number.
Save applies the changes. Except for the picture and the name, none of this goes through Meta review.
Instagram and Facebook Messenger
Much shorter than WhatsApp, but with a twist worth understanding first: it is two steps, not one. First you authorize in Meta — granting access to every page you tick — and then, back in Biky, you pick which of those pages to connect. Authorizing on its own connects nothing.
What you need beforehand:
- To be an administrator of the Facebook page or the Instagram account.
- For Instagram, the account has to be professional (business or creator) and linked to a Facebook page. A personal account does not show in the list, and that is the most common reason it "is not there" when picking.
1. Authorize in Meta
From Channels → Facebook Messenger (or Instagram), click Add channel. A Meta window opens asking for permissions for the BIKY.ai Social Pages app.
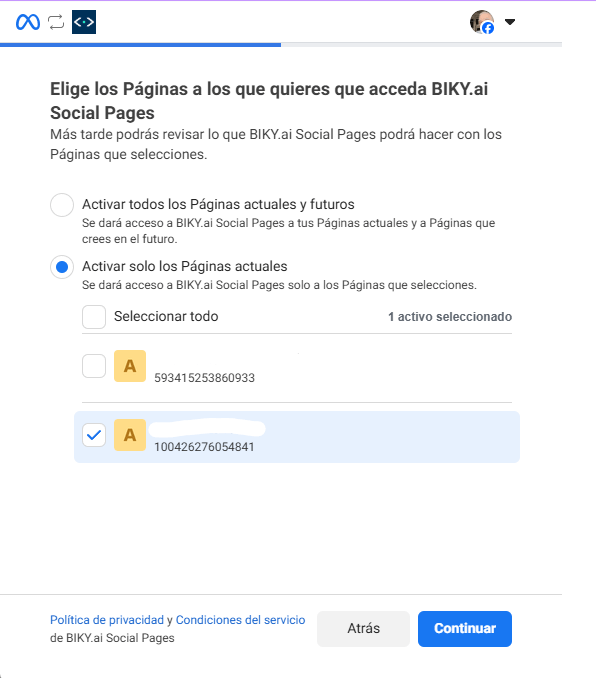
Choose the Pages you want it to access. Two options:
- Opt in to all current and future Pages — including ones you create later.
- Opt in to current Pages only — you tick them one by one from the list.
Picking only the current ones is the sensible choice if you manage pages that have nothing to do with this business. The trade-off is that if you create another page tomorrow and want to connect it, the authorization has to be done again.
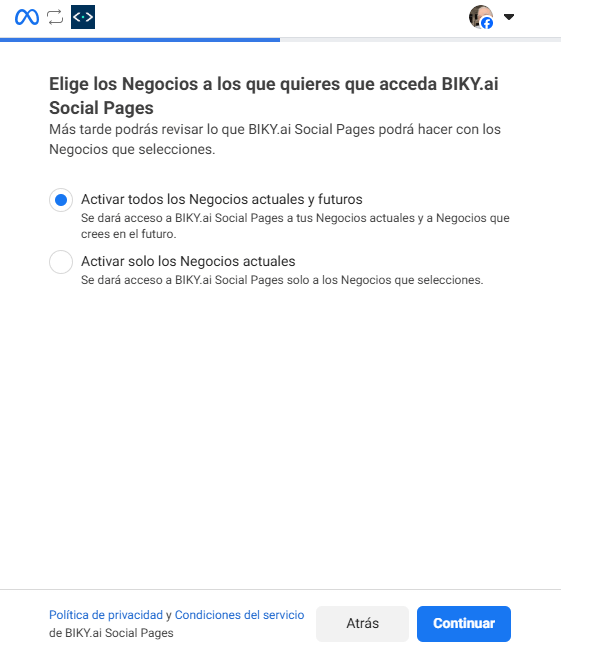
Choose the Businesses, with the same choice: all current and future, or only the ones you tick.
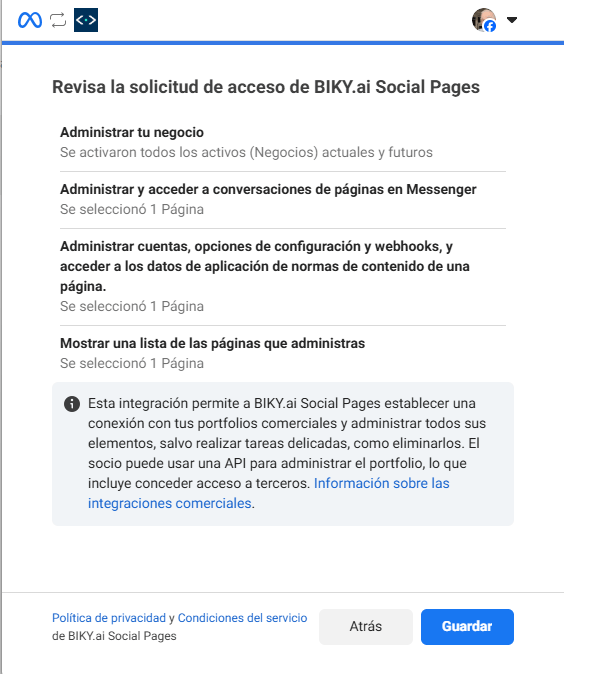
Review the request and hit Save. Meta lists exactly what you are granting:
| Permission | What for |
|---|---|
| Manage your business | Read your business portfolio's structure. |
| Manage and access page conversations in Messenger | The permission that makes it all work: without it messages never reach Smart Chat. |
| Manage accounts, settings and webhooks of a page | The webhook is what tells Biky a new message arrived. |
| Show a list of the pages you manage | What later fills the dropdown in step 2. |
The window itself states the scope: the integration can manage the portfolio's assets, except sensitive tasks such as deleting them.
2. Connect the page in Biky
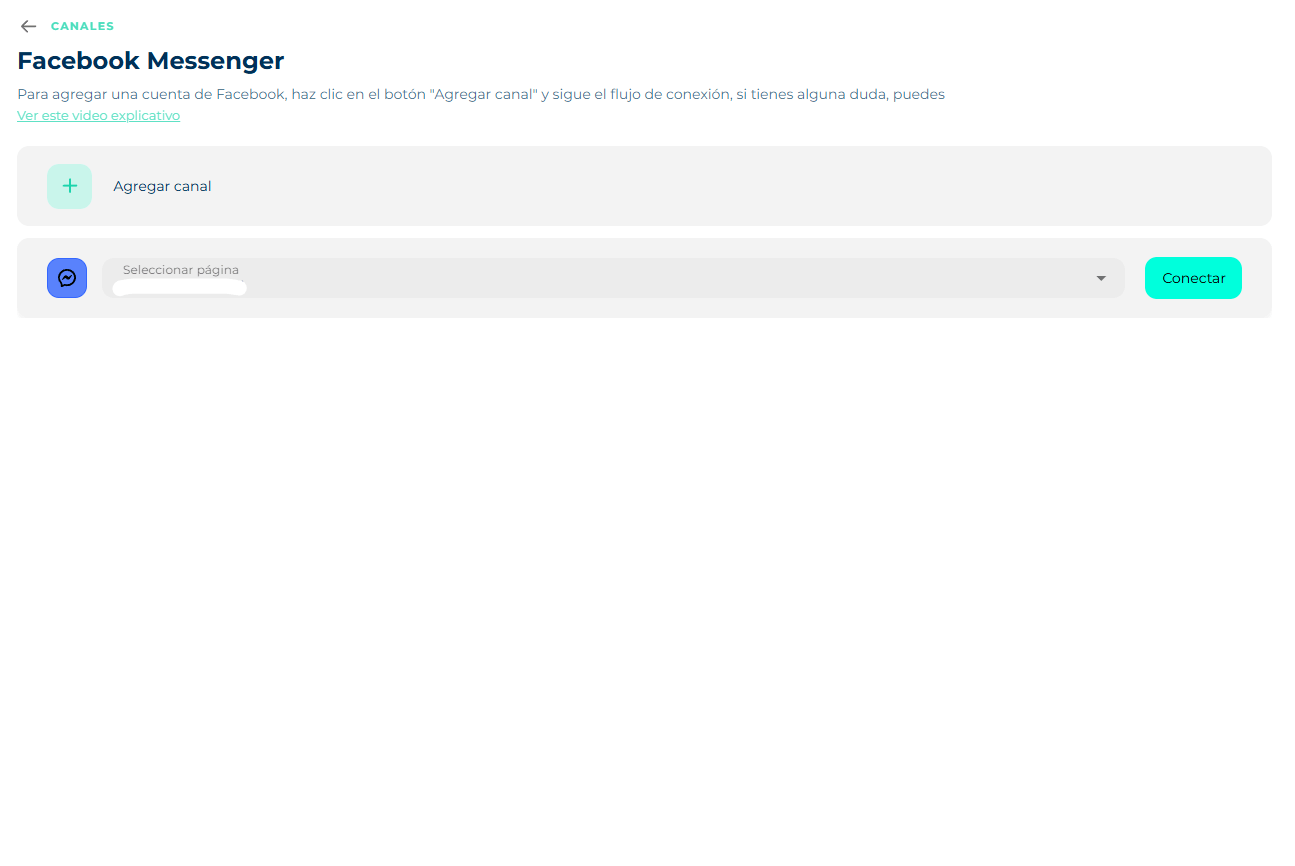
When Meta's window closes, a new row appears in the channel's list with a Select page dropdown and a Connect button. Pick the page and hit Connect.
Stop here and the channel is not connected
You authorized in Meta, but the page is still not linked. That half-done row sits there waiting: if you find it when coming back, someone authorized and never finished. Pick the page and connect, or cancel and start over.
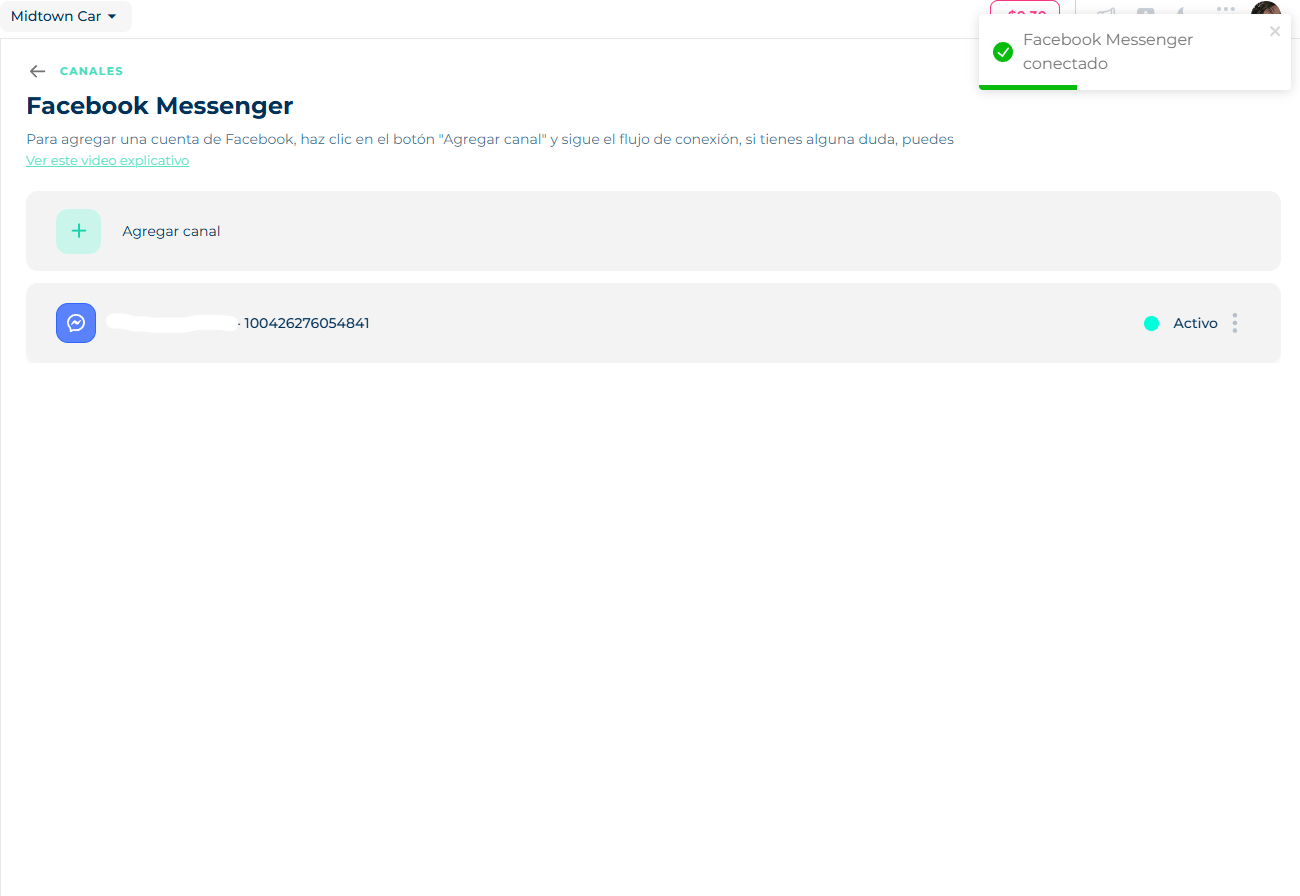
A notice confirms Facebook Messenger connected and the page stays in the list with its ID and an Active status, with a ⋮ to manage it.
On Instagram the path is the same; what changes is that you pick the Instagram account instead of the page.
From then on, direct messages land in Smart Chat like any other chat.
Meta's 7 days
On Facebook and Instagram, Meta only allows replying within 7 days of the customer's last message. After that the composer locks and no template helps: you have to wait for the person to write again. See Handle a conversation.
TikTok
To add a TikTok account, click the "Add TikTok" button and follow the connection flow.
With a personal account you can only read
The screen itself warns about it: to send and receive messages the account has to be a Business Account. Connect a personal one and your customers' messages reach Smart Chat but cannot be answered from the platform. Converting the account to Business is done in the TikTok app and is free.
Meta forms
Connect your Facebook pages and manage their lead forms.
Not a conversation channel: it is the door for ad leads. When someone fills a Facebook or Instagram Ads form, instead of sitting in a CSV somebody downloads every week, it reaches the platform in seconds — and, if you set it up, with a SalesCard created and a message already sent.
It is one of the most profitable things to configure well: between someone leaving their details on an ad and getting a first reply there are usually hours or days, and that is where they are lost.
Connecting
Connect pages lets you pick which Facebook pages to link; the list then shows them.
The leads permission is separate
If you chose Customize access in Meta when authorizing, access to leads is not included, and the CRM has to be added by hand in the page's settings. Without that, pages show as connected but not a single lead arrives — and it is hard to notice, because nothing fails: nothing simply comes in.
The page's forms
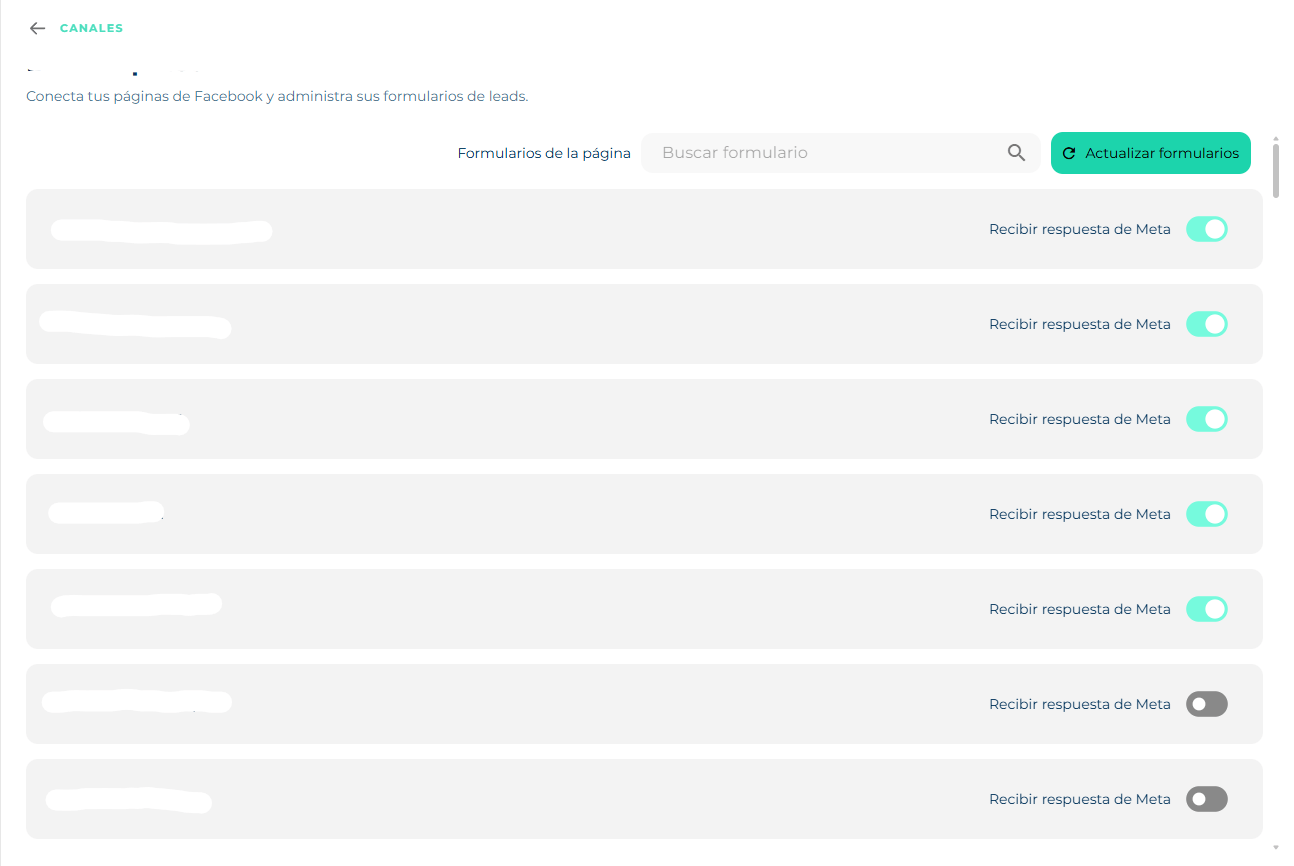
Opening a page shows its lead forms, with a search box and a Refresh forms button that pulls them from Meta again. If you just created a form in the ads manager and do not see it, that is the button.
Each form has a Receive response from Meta switch: it decides whether leads from that form come in or not. Off, the form still exists in Meta and still collects data, but nothing arrives here — useful for leaving old campaigns out without disconnecting the whole page.
What happens when a lead arrives
Opening a form defines what happens with every person who fills it.
Default
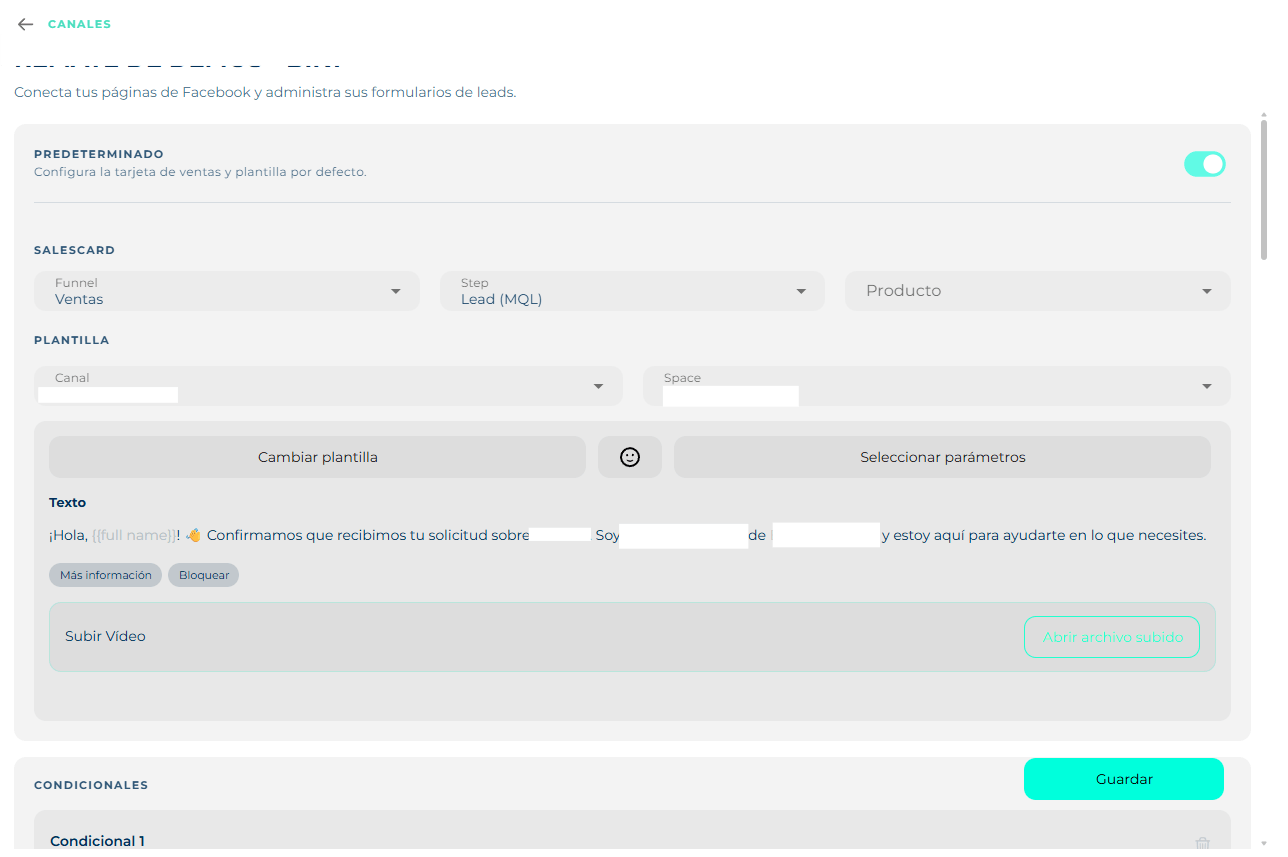
A switch turns on the default behavior: configure the default sales card and template.
SalesCard — the opportunity created on its own in Funnels:
- Funnel and Step: where the card is born. Usually an entry step such as Lead (MQL).
- Product: if the campaign is about a specific product, it is attached from the start.
Template — the message sent to the lead right away:
- The Channel and the Space it goes out from, which also decides which inbox the conversation lands in.
- Change template picks which of your approved templates is sent, and Select parameters fills its variables — the full name, the phone — with what the person just typed into the form.
- If the template has buttons (More information, Block) or takes video, that is configured here.
The immediate message is the point
An ad lead is warm for minutes. Answering right then with a template that uses their name and mentions what they asked for is the difference between a conversation and a number on a list.
Conditionals
What turns this into real routing: sending someone somewhere different depending on what they answered in the form.
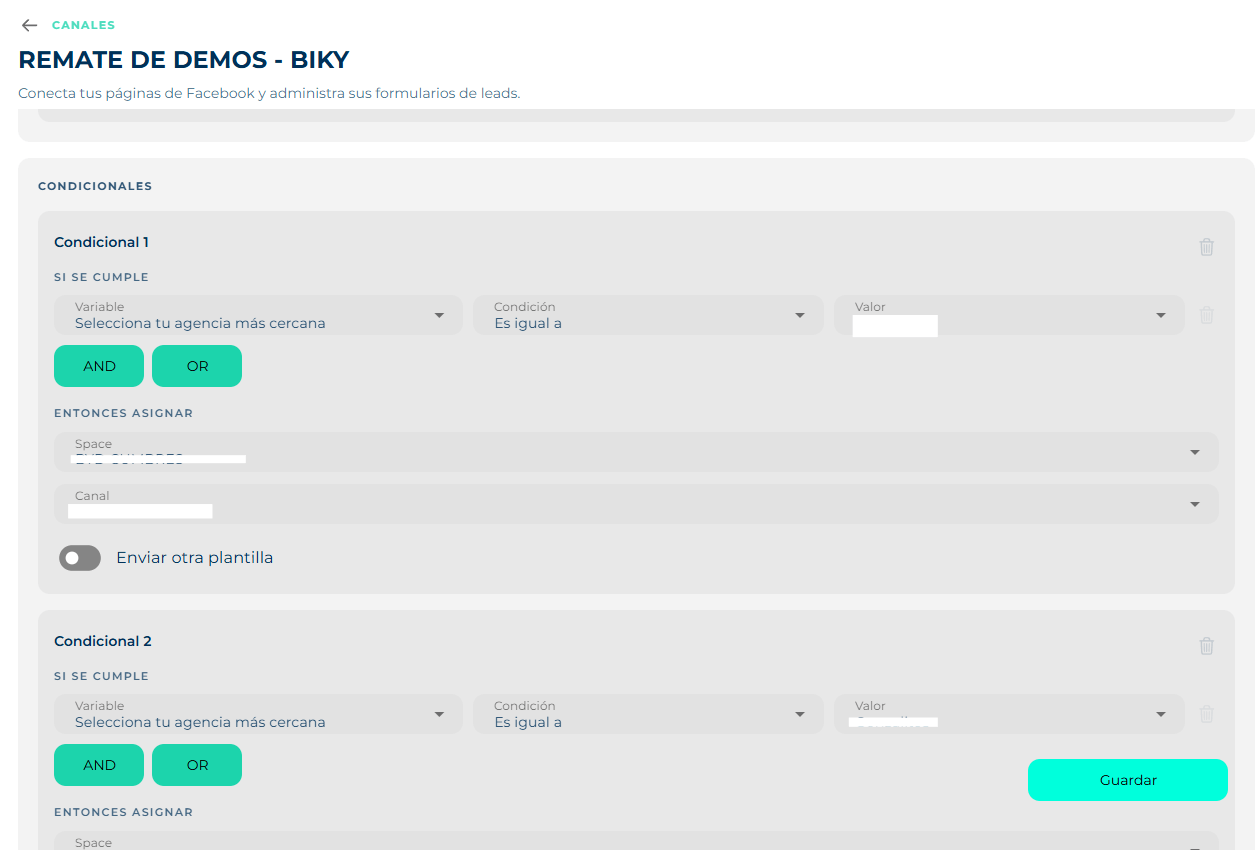
Each conditional is built the same way:
- If it matches: you pick a Variable — one of the form's own questions, for instance Choose your nearest dealership —, a Condition (Is equal to…) and a Value.
- With AND and OR you chain more conditions onto the same case.
- Then assign: the Space and the Channel that lead goes to.
- Optionally, Send another template: a different message from the default for that case.
You can have several conditionals, and they are all stored together with Save.
The typical case is a network with branches: the form asks for the nearest one, and each answer sends the lead to that branch's space, with that branch's line and a message naming it. Without this, leads from every city land in the same inbox and someone has to hand them out — which is exactly the time the lead spends waiting.
Call lines
Buy or verify phone lines to make and receive calls.
Actual telephony, different from WhatsApp calls. Two routes:
- Buy line — a Keybe number, in the country you choose. It is the only way to receive calls.
- Add your own line — a number you already have. It only works for calling out, not for receiving.
The list shows each line with its name, number, status and date. Which one each advisor uses is decided in the calls button in Smart Chat.
Buying a line is charged
It shows as a monthly subscription in Billing, separate from the plan.
Your website's channels
The four that connect nothing external: there is no Meta account to authorize and no number to get approved. Here you design something — a chat, a floating button, a form — and the platform hands you back a script: a few lines of code someone has to paste into your website for it to show up. If you don't run the site, that part goes to whoever does.
The first three are built the same way, in two stages: Design (how it looks) and Configure (what it says and what happens when someone uses it).
Web chat
Design a custom web chat so your customers talk to you directly without leaving your website.
The classic corner chat. The visitor types right there, without leaving your page, and that conversation lands in Smart Chat like any other.
Design
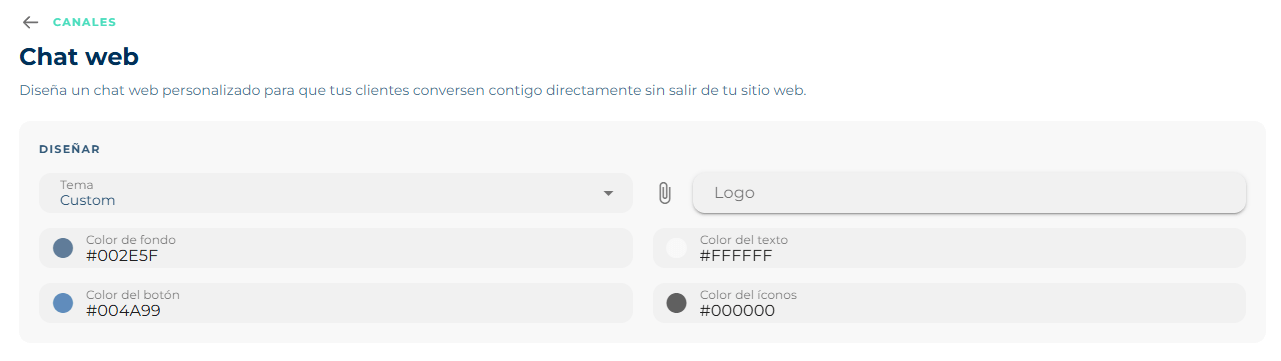
Theme brings ready-made combinations; choosing Custom enables the four colors, each with its hex code:
| Color | What it paints |
|---|---|
| Background color | The chat window. |
| Text color | What is read on that background — leave it dark on a dark background and nothing is legible. |
| Button color | The send button and the one that opens the chat. |
| Icon color | The attach, close and other small icons. |
The clip next to Logo uploads the image shown in the chat header. Use your brand's, not the agent's: here the visitor expects to recognize the company.
Configure
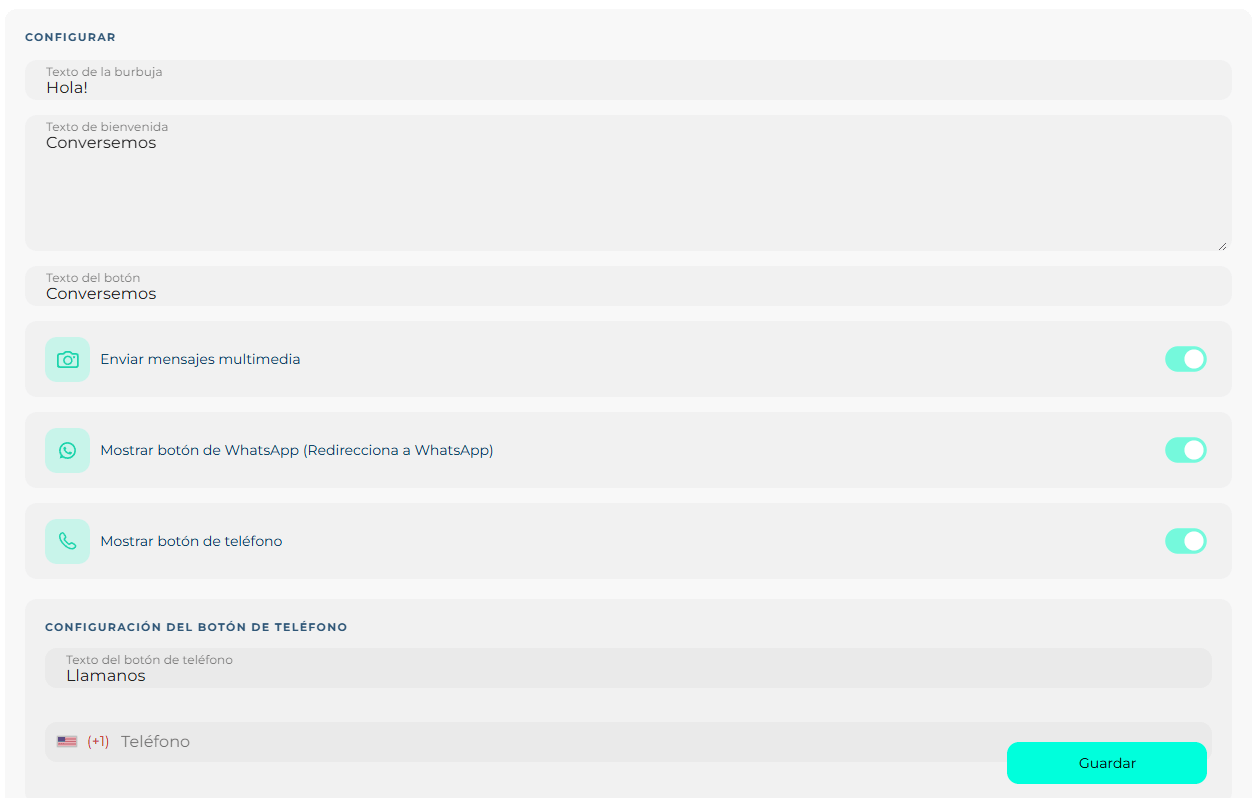
| Field | What it is |
|---|---|
| Bubble text | What is read before opening the chat, next to the button. It is the only thing someone who doesn't click ever sees, so make it inviting. |
| Welcome text | The first message once the chat is open. |
| Button text | The label on the button that starts the conversation. |
| Send media messages | When on, the visitor can attach photos, files and audio. Very useful in support ("send me a photo of the error"); turn it off if you'd rather not receive files from strangers. |
| Show WhatsApp button | Adds a button that takes the visitor out of the chat and over to WhatsApp. Mind the contradiction: if your goal is conversations without leaving the site, this button does the opposite. It makes sense when you'd rather have the person's phone number. |
| Show phone button | Adds a button to call you. Turning it on reveals Phone button configuration: the text that is read ("Call us") and the number with its country code. It is a plain phone link — on a mobile it opens the dialer — so that call is not recorded in the platform. |
Permanent messages
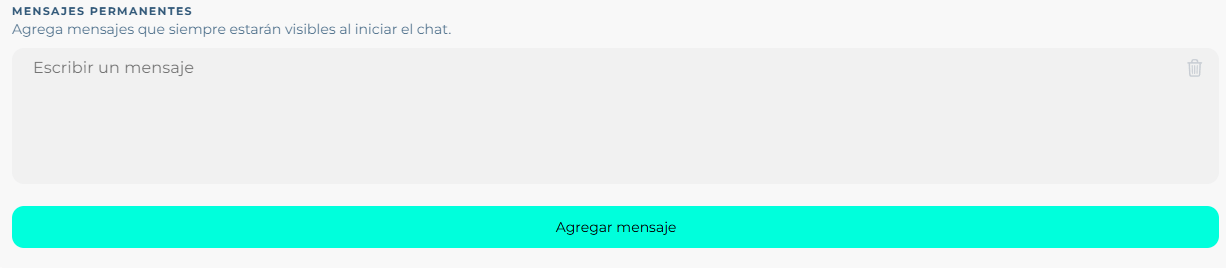
Add messages that will always be visible when the chat opens. They are not auto-replies and they don't depend on what the person writes: they are there from the moment it opens. Use them to get ahead of what everyone asks — hours, payment methods, delivery areas — and cut the volume of repeat conversations.
Add message adds another; the trash can removes it. Save applies everything.
Biky Widget
Create widgets with your custom avatar so your customers reach you easily through a WhatsApp redirect, a template or an external website.
It is not a chat. It is a floating button with a person's face that opens a short form; when the visitor submits it, the conversation moves somewhere else — almost always to WhatsApp. Its job is turning an anonymous visit into a contact with a phone number.
You can have several: one per page, one per campaign. That is why each one has a name.
Design
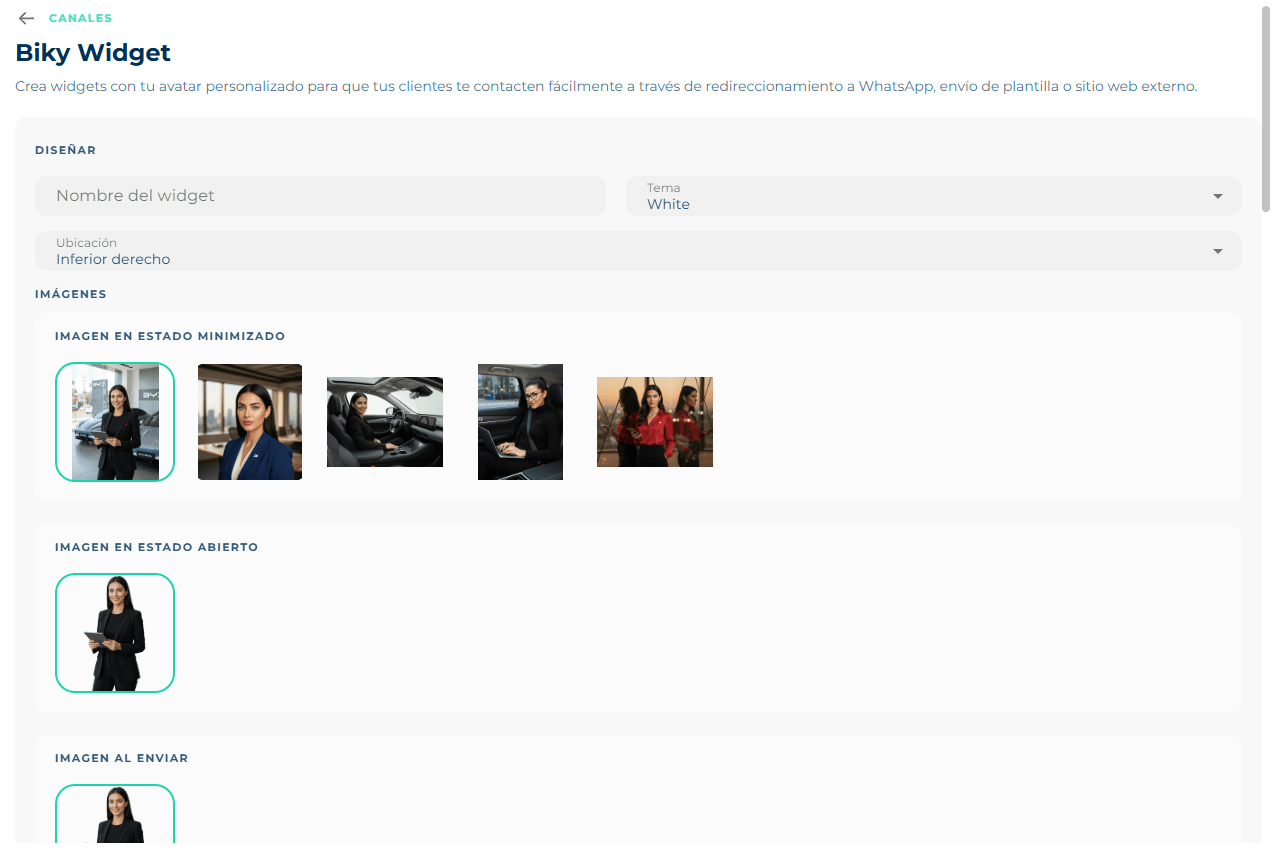
- Widget name — internal, so you can tell them apart once you have five.
- Theme — the color combination.
- Location — which corner it sticks to: bottom right is the usual one, but if you already have something there (a cookie button, a cart) move it.
Plus three images, which are three different moments:
| Image | When it shows |
|---|---|
| Minimized state | The small face on the closed button, the one that follows the visitor the whole time. |
| Open state | The large photo when they click and the form appears. |
| On send | The one that goes with the confirmation message, once the data is in. |
The gallery ships ready-made avatars, and you can upload your own. If your agent already has a name and a face in Biky admin, use that same photo: a button showing one person and a WhatsApp answering as another is confusing.
Texts
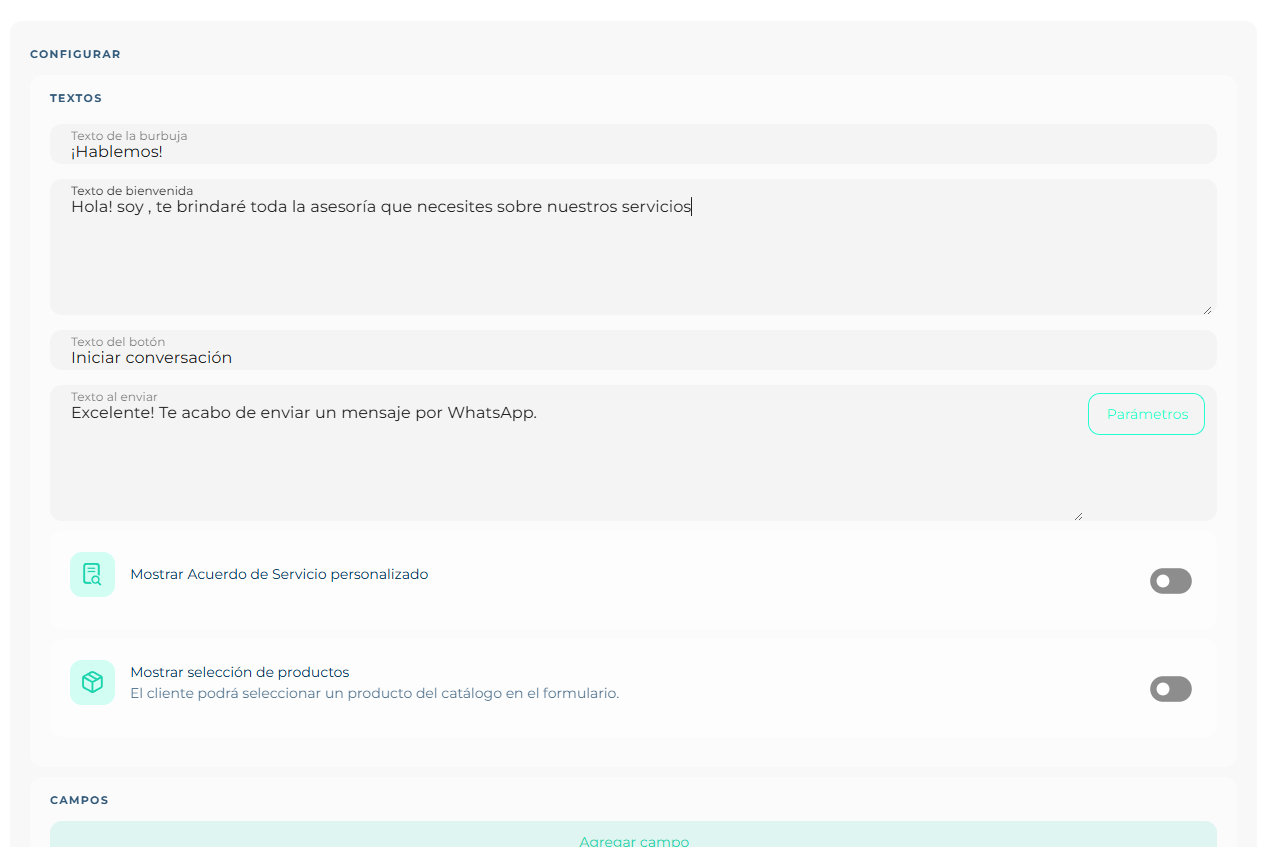
- Bubble text — the hook read without opening anything ("Let's talk!").
- Welcome text — the greeting inside the widget, where the agent introduces itself.
- Button text — the label that confirms the submission ("Start conversation").
- On-send text — what the person sees after leaving their details: "Great, I just sent you a message on WhatsApp." Tell them what just happened, because if they wait for an answer on the web while you wrote to their phone, you lose them. The Parameters button inserts variables that get replaced with what they just typed, so you can use their name.
Below, two switches:
- Show custom Service Agreement — adds the data-consent checkbox with your own legal text. If your country requires explicit consent before contacting someone, this is where it gets collected.
- Show product selection — the customer will be able to pick a product from the catalog in the form: adds a selector with your Catalog products. The lead arrives saying what they want, and the SalesCard is born with that product on it.
Fields
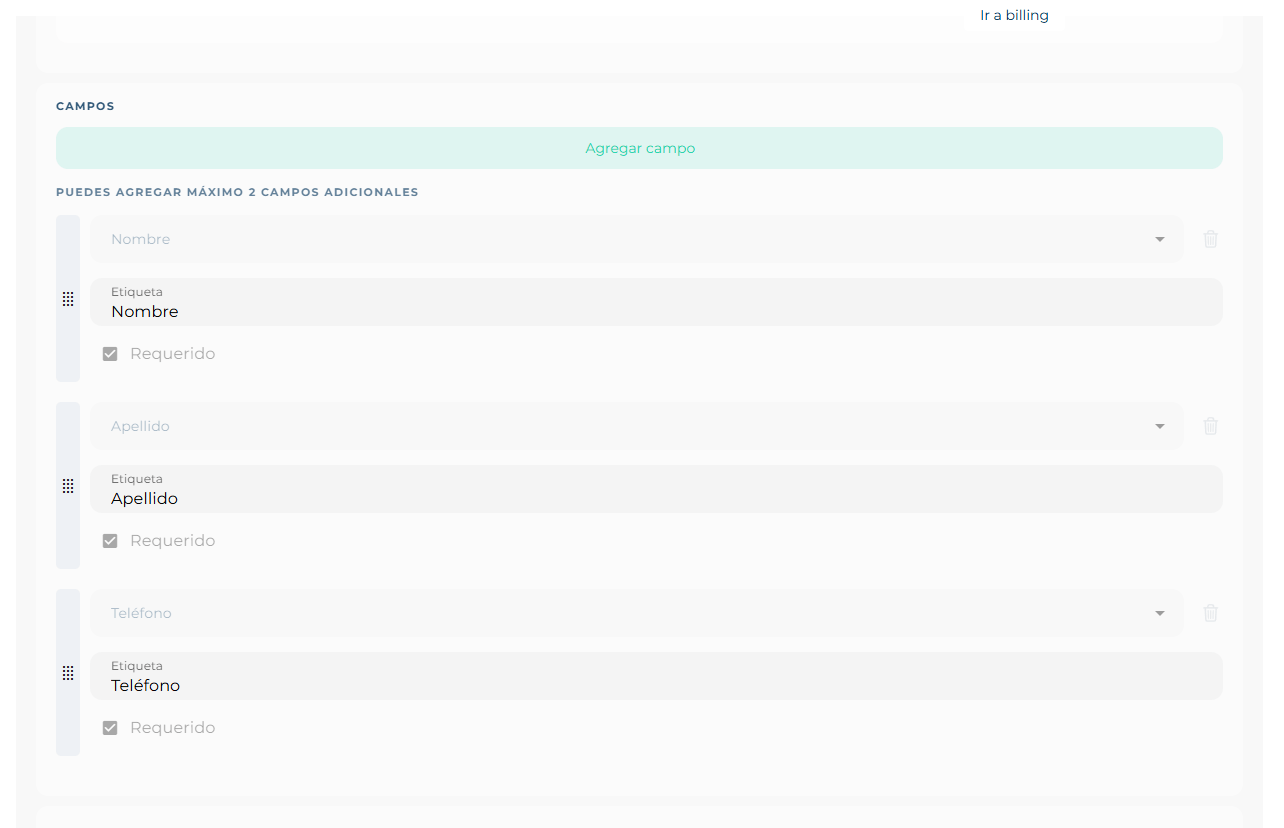
Name, Last name and Phone are fixed and required: without a phone there is nowhere to move the conversation to. For each one you can change the Label, which is the text the person reads — nothing forces you to write "Phone", you can ask "Which WhatsApp should we write to?".
Add field adds more, with a cap: you can add a maximum of 2 additional fields. The limit is deliberate — every extra field lowers the number of people who finish the form. The dotted handle on the left drags to reorder; the trash can deletes the ones you added.
What happens on send
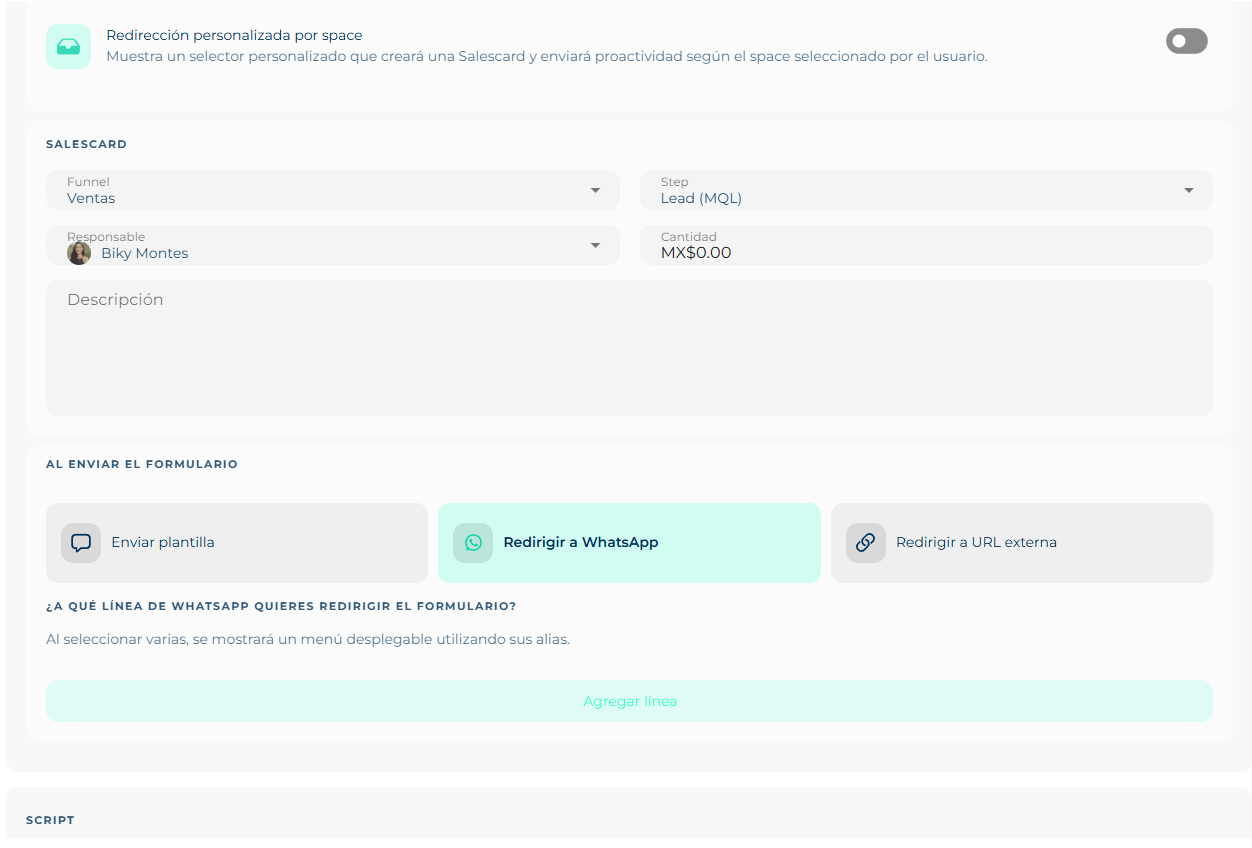
- Custom redirect by space — shows a custom selector that will create a Salescard and send proactivity according to the space the user picks. In plain terms: the visitor chooses which space they go to — the branch, the city, the area — and the lead routes itself, with nobody handing it out. Turn it on if you have several branches; leave it off if everything lands in the same inbox.
- SalesCard — the opportunity created in Funnels with every submission: which funnel it falls into, which step it starts at, who the owner is, for what amount and with which description. Leave it empty and the lead comes in as a contact with no deal attached.
- On form submit — the destination, and there are three:
| Option | What it does |
|---|---|
| Send template | The platform sends a WhatsApp template to the number they left. The conversation starts from your side, with an approved message, and sits in Smart Chat from second one. |
| Redirect to WhatsApp | The visitor leaves for WhatsApp with the chat already open and the first message written; all they do is hit send. |
| Redirect to external URL | Takes them to another page: a thank-you, a payment gateway, a booking calendar. |
With the first two you pick which line it goes to. If you add several, the visitor sees a dropdown with those lines' aliases — reason enough for the aliases to say something ("Sales Bogotá", "Tech support") rather than "Line 2".
Script
The code is generated with one of the account's API keys. Save the widget first: while it doesn't exist, the block answers create the widget first to generate the code.
Web form
Create a web form to collect your customers' information and generate leads.
The same as the widget, but without the floating button: instead of peeking out of a corner, the form takes its own space. It is what you put on a campaign landing page, a pricing page, or behind a "leave us your details".
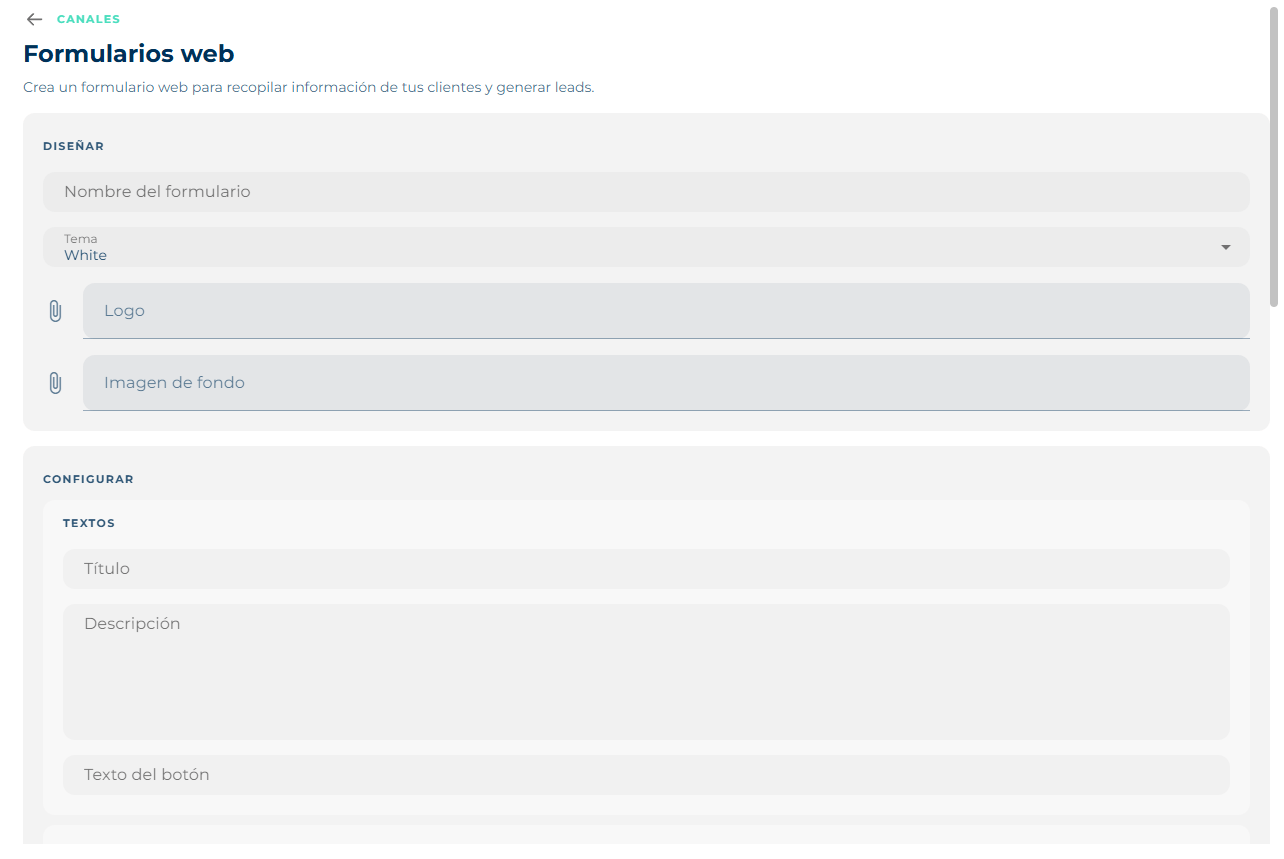
Design changes to what makes sense for something that fills the screen: besides the name and the theme, you upload a logo and a background image. And the texts are a page's, not a bubble's: Title, Description and Button text.
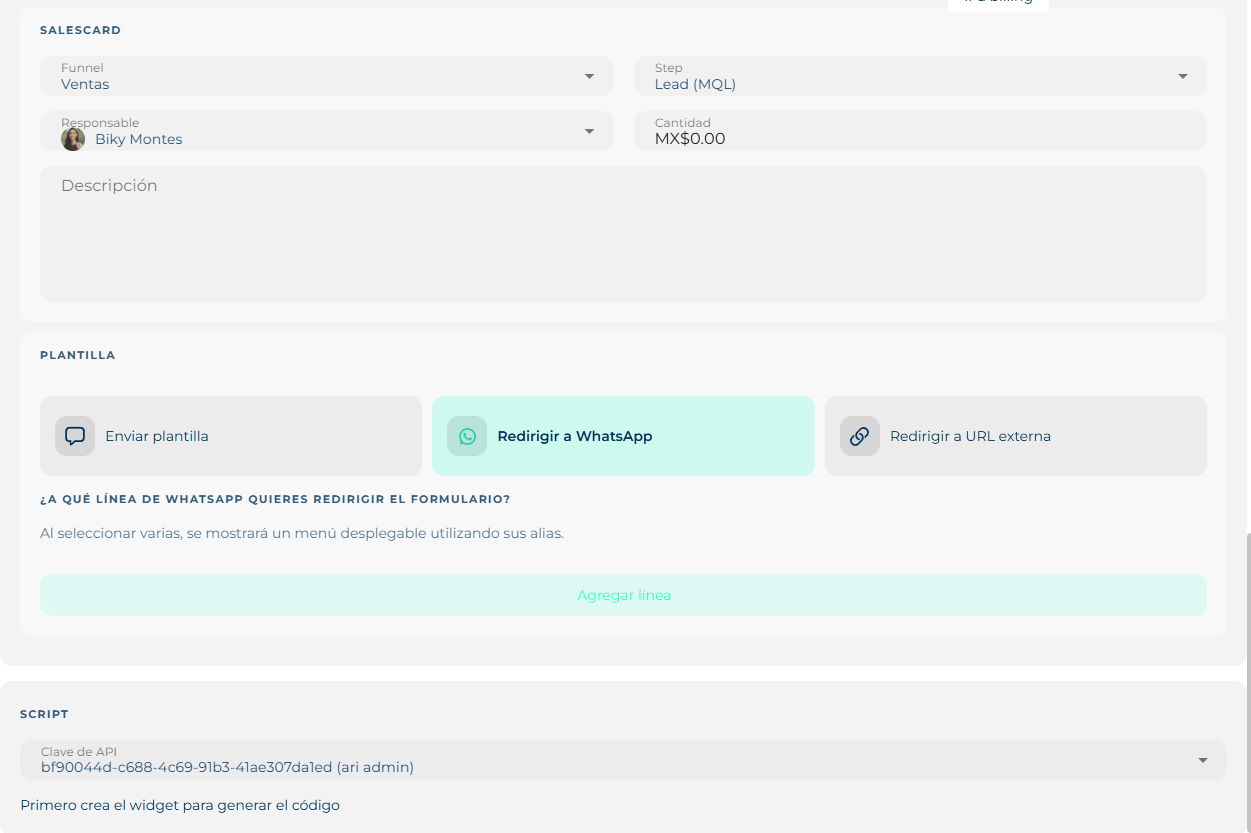
From there on it is identical to the widget: the fields (Name, Last name and Phone fixed, with their label and required checkbox), the SalesCard that gets created, the destination on send with the same three options and the line selector, and the script with its API key.
Code builder
Generate a script to arrange multiple widgets for your website.
If you are going to put more than one widget up, this bundles them into a single script. You pick the API key and the widgets to include, and the code appears on the right ready to copy. Without at least one widget and one key it generates nothing.
It is what avoids the classic problem of pasting three loose scripts and having the buttons stack on top of each other.
After connecting
- Assign the channel to a space, so conversations land in the right inbox.
- If it is WhatsApp, create at least one template and submit it for review: without an approved template you cannot write to anyone first.
- Check the configuration progress: connecting the channel adds 10%.