The board
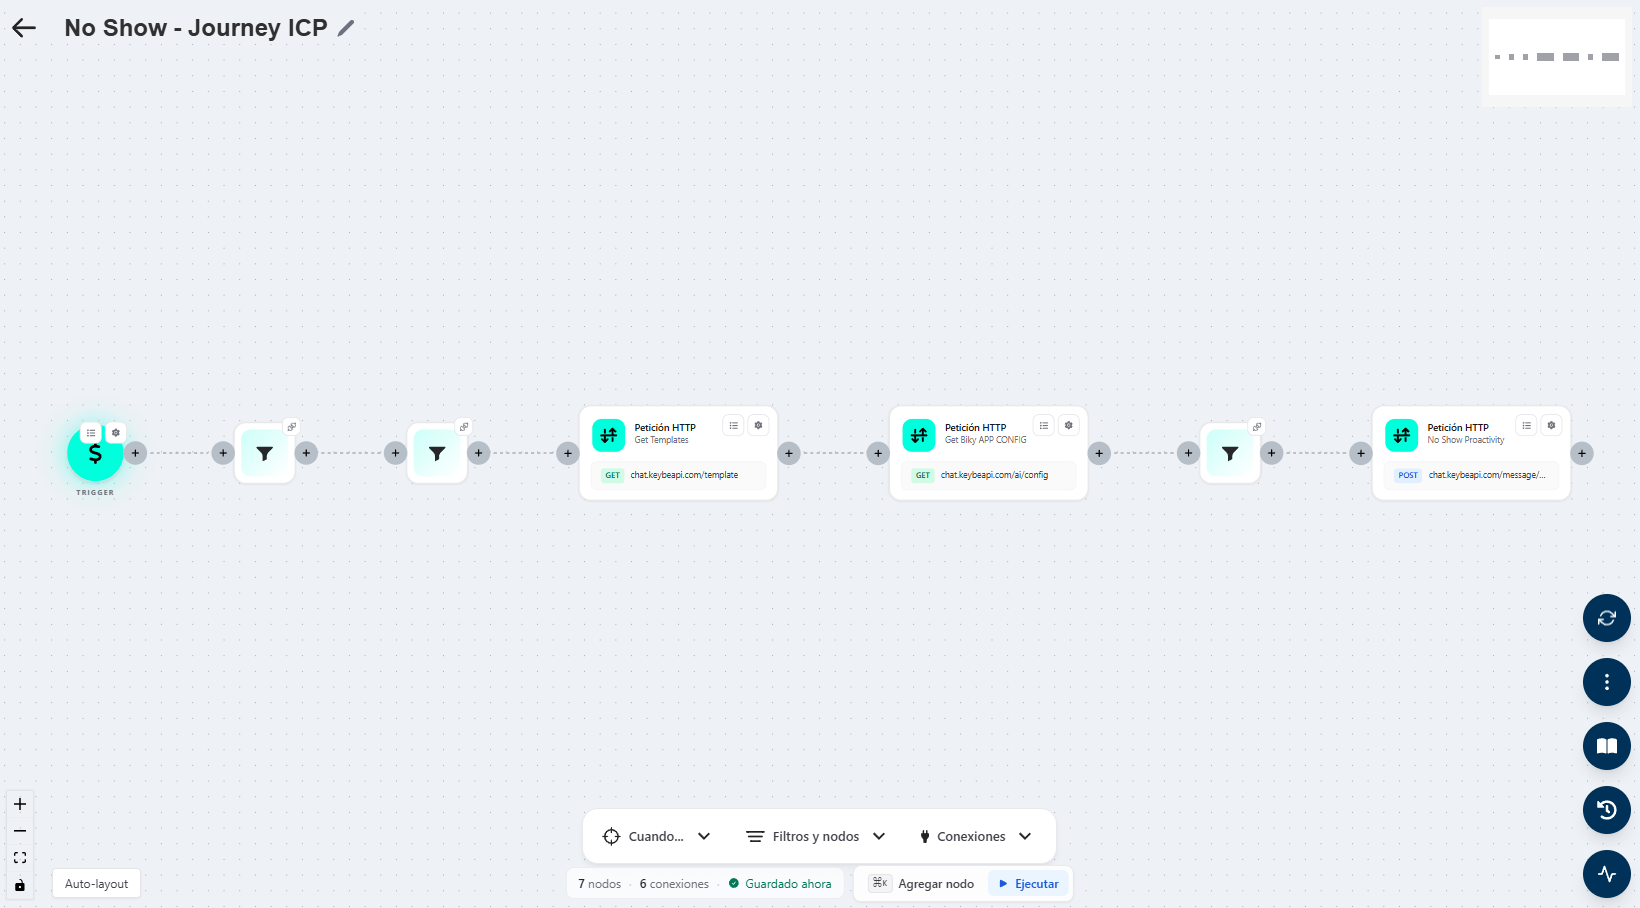
Opening a flow takes you to the board: the trigger on the left and the nodes chained to the right, joined by lines.
The screen
Top: the ← arrow goes back to the list; the flow name with a pencil to rename it. Top right, the minimap.
Bottom center, the building bar with three menus:
- When… — the flow's trigger.
- Filters and nodes — the nodes you can add.
- Connections — the available integrations.
See Triggers and nodes for the detail of each.
At the bottom, the status: 7 nodes · 6 connections · Saved now. The flow saves itself; the indicator tells you how long ago. On the right, ⌘K Add node (keyboard shortcut) and Run.
Bottom left: zoom + / −, fit view, lock the board (prevents moving nodes by accident) and Auto-layout, which tidies everything up.
On the right, four round buttons:
| Button | What it opens |
|---|---|
| Reload | Fetches the flow from the server again. |
| ⋮ More | Export flow (downloads the file to import into another account) and Create template. |
| Connections guide | Explains how to integrate with each platform: click the connection to see the available options. |
| Version history | Saves a snapshot of the flow's current state, with an optional comment, and lets you go back to it. |
| Run history | Every time the flow ran. |
Build a flow
- Pick the trigger under When…. Every flow starts there.
- Add nodes: from Filters and nodes, with the + that appears between two nodes, or with ⌘K.
- Click a node to configure it (the gear) or see its data (the list icon).
- Connect nodes by dragging from one's output point to the other's input.
- Changes save themselves. Check the bottom bar says Saved.
Save a version before touching something delicate
Before restructuring a flow that already works, open Version history and save a snapshot with a comment ("before adding the 72h touch"). If something goes wrong, you go back to it.
Test and monitor
Run executes the flow right away, without waiting for the trigger. It is how you check that HTTP requests respond and that filters let through what they should.
Run history lists each run with date, time and status (Completed and others), with a date range filter and Apply. That is where you see whether a flow has been failing and since when.
Running does real things
If the flow sends a WhatsApp message or creates a SalesCard, Run actually does it, on real data. To test messages, use a test contact first.
Export, import and templates
- ⋮ → Export flow downloads the flow. Import flow (in the list) uploads it into another account. That is how you replicate an automation across accounts.
- ⋮ → Create template publishes it as a reusable template.
- Templates (in the list) opens the catalog, filterable by flow type, so you can start from something already built instead of a blank canvas.